
Post by summer201016 on Jul 2, 2013 4:22:58 GMT -5
Xilisoft Blu-ray Creator can easily convert and burn HD camcorder videos like Sony (M2TS), Panasonic (MTS) to Blu-ray discs, and convert other video formats to Blu Ray disc, which include AVI, MP4, MKV, DV, MPEG, MOV, QT, RM, RMVB, WMV, DivX, H.264/AVC, XviD, ASF, DAT, FLV, VOB, 3GP. Xilisoft Blu-ray Creator can handle many brands of AVCHD camcorders or DVs, like Panasonic, Sony, Hitachi, Canon as well as JVC. You can now record your unique AVCHD videos, convert AVCHD to Blu Ray video and discs, view your own micro movie on HDTV along with your family. The subsequent post will disclose how to use Xilisoft Blu ray Creator to create Blu ray detail by detail.
Find Discount code for <strong>Xilisoft Blu ray Creator[/b] here and then download and install Xilisoft Blu ray Creator with your computer.
How to create Blu ray?
Step1. Import videos for the program
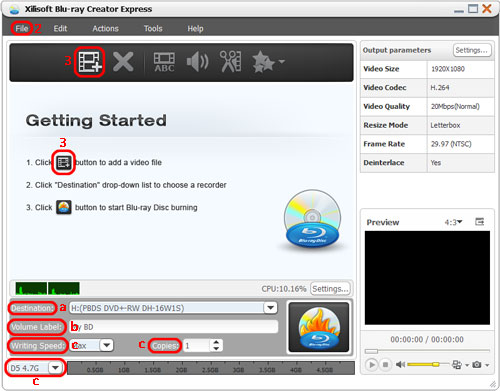
Start Xilisoft Blu-ray Creator, Directly drag and drop files into your Xilisoft Blu-ray Creator window or click “File” and select "Add Video File(s)..." with the "File" menu to opt for the videos you want to add.
Step2. Edit videos
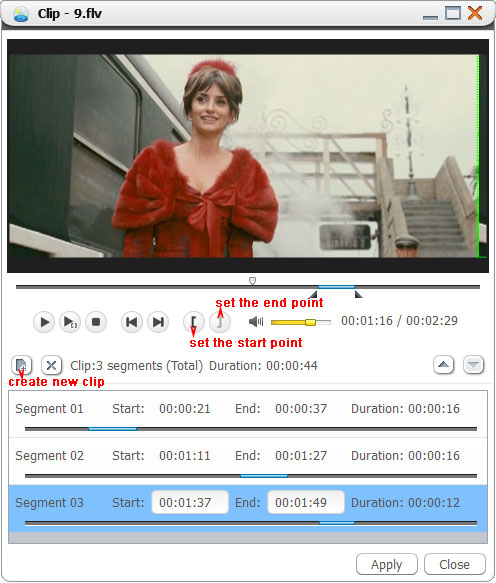
If the origin video file is simply too large or you wouldn't like to burn some parts than it, it is possible to click on "Clip" button in the tool bar to look at within the "Clip" window. And then set first and the end point with the segment you would like by dragging the slider. You may create multiple preferred video clips.
Step3. Individualize output effect
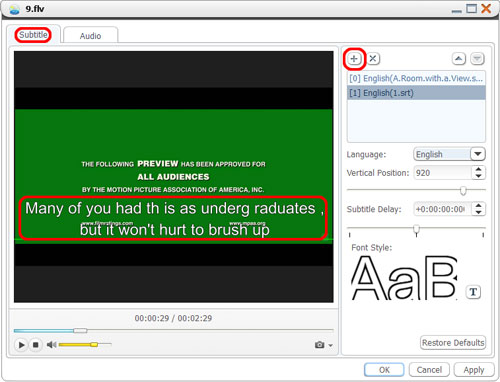
There are lots of factors are supplied for further customizing output effect. You're allowed to provide audio track, subtitle and effects are optional steps prior to the actual burning process. Highlight your video file and then click "Subtitle" or "Audio" button to open the dialog window. In the "Subtitle" dialog, click "Add Subtitle..." to decide on the subtitle file. You are able to specify the words, vertical position, subtitle delay and font style.
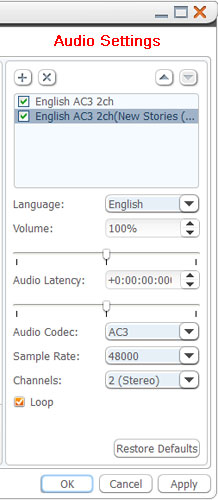
In the Audio dialog, click on "Add Audio Track..." button to decide on the audio file. You can also specify language, volume, audio latency, codec, sample rate and channels to get the best results.
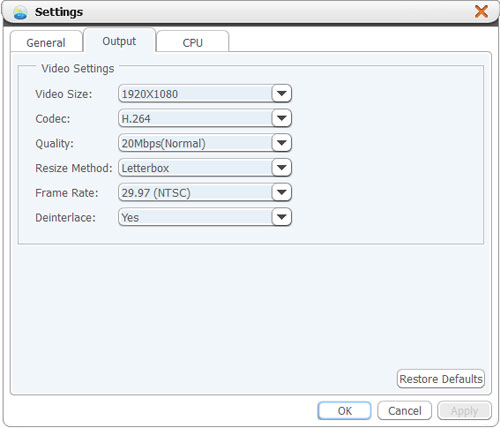
Step4. Settings
To produce a lot more accurate parameters settings, just click on “Settings” button and you can adjust resolution, codec, resize method, frame rate, CPU core number, plus the temporary file location and so on.
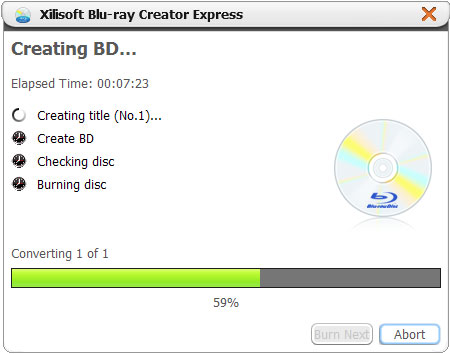
Step5. Start Blu-ray Burning
Please be sure you have decided on each of the video files you would want to burn.
If all previously is performed, you can go through the "Burn" button for the left side in the preview window. The creating process will automatically start based on the file list order.
Insert an empty of Blu-ray disc into your driver of PC while the message reminds you of inserting disc.
How long this Blu-ray burning process will take is determined by the duration of your source video file in addition to the file size.
Find Discount code for <strong>Xilisoft Blu ray Creator[/b] here and then download and install Xilisoft Blu ray Creator with your computer.
How to create Blu ray?
Step1. Import videos for the program
Start Xilisoft Blu-ray Creator, Directly drag and drop files into your Xilisoft Blu-ray Creator window or click “File” and select "Add Video File(s)..." with the "File" menu to opt for the videos you want to add.
Step2. Edit videos
If the origin video file is simply too large or you wouldn't like to burn some parts than it, it is possible to click on "Clip" button in the tool bar to look at within the "Clip" window. And then set first and the end point with the segment you would like by dragging the slider. You may create multiple preferred video clips.
Step3. Individualize output effect
There are lots of factors are supplied for further customizing output effect. You're allowed to provide audio track, subtitle and effects are optional steps prior to the actual burning process. Highlight your video file and then click "Subtitle" or "Audio" button to open the dialog window. In the "Subtitle" dialog, click "Add Subtitle..." to decide on the subtitle file. You are able to specify the words, vertical position, subtitle delay and font style.
In the Audio dialog, click on "Add Audio Track..." button to decide on the audio file. You can also specify language, volume, audio latency, codec, sample rate and channels to get the best results.
Step4. Settings
To produce a lot more accurate parameters settings, just click on “Settings” button and you can adjust resolution, codec, resize method, frame rate, CPU core number, plus the temporary file location and so on.
Step5. Start Blu-ray Burning
Please be sure you have decided on each of the video files you would want to burn.
If all previously is performed, you can go through the "Burn" button for the left side in the preview window. The creating process will automatically start based on the file list order.
Insert an empty of Blu-ray disc into your driver of PC while the message reminds you of inserting disc.
How long this Blu-ray burning process will take is determined by the duration of your source video file in addition to the file size.